How To Install a Plaque on a Mountaintop (or Other Remote Place)
By
Alan Silverstein,
ajs@frii.com
Last update: March 29, 2026
Challenger Point Plaque (click to expand), July 19, 2003, 16 years to
the day after installation, including apparent lightning strike damage
to the "w".

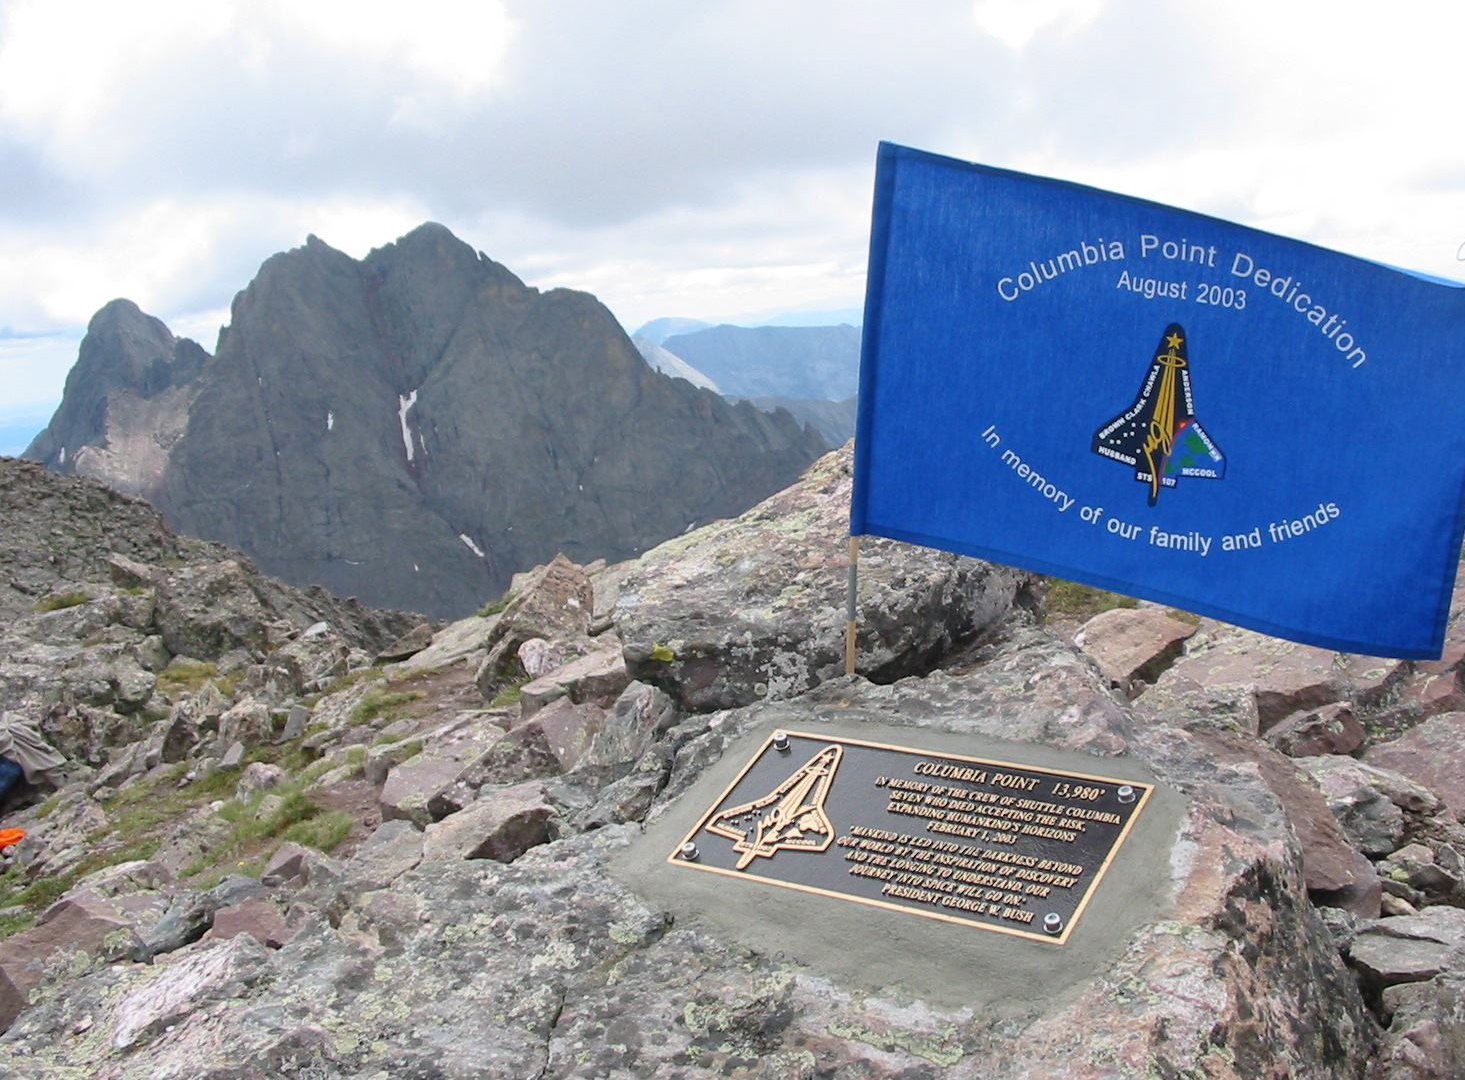
Columbia Point Plaque, freshly installed, August 8, 2003.
Purpose
Record and share the "recipe" for installing a memorial plaque on a
summit or other remote location where some planning is required.
No, I don't aim to cover the world with memorials!
I just happen to have some first-hand experience I want to capture and
make available to the world for those rare occasions when it's
invaluable.
You might also find this information useful for installing memorials
that are not in remote places.
Background
In 1986 after the Challenger space shuttle disaster, a Colorado Springs
engineer proposed naming the northwest shoulder, 14,080'+, of Kit Carson
Mountain, Colorado, 14,165', as Challenger Point. In the summer
of 1987 I led a small expedition (seven people to camp, five to the
summit) to place the 6x12 inch bronze memorial plaque which remains on
that peak. We used a mallet and star bits to drill the bolt holes.
Fortunately we had perfect weather and could spend seven hours on the
summit. You can read about this expedition
here.
In 2003 after the Columbia space shuttle disaster, a four-time NASA
space shuttle astronaut proposed naming the southeast shoulder,
13,960'+, of the same Kit Carson Mountain, as Columbia Point.
It was formerly known colloquially as "Kat Carson", and the next bump
east as "Kitty Kat Carson".
This proposal was quickly approved by the US Geological Survey Board on
Geographic Names.
In July 2003 a small group of six, including two astronauts, visited the
summit to select and prepare a plaque site.
We used a hammer drill and bits for the bolt holes.
We ran out of sharp bits, battery charge, and good weather, all in less
than three hours.
In August we returned with 15 4WD vehicles, 21 volunteers, and 34 NASA
and NOLS people, including most of the Columbia family members, for a
two night camping trip, plaque installation, a dedication ceremony, and
an F16 missing-man flyby.
We had crummy weather again, but three of us were able to complete
plaque installation in about three hours.
Recipe
The following supplies list and process steps are based on my
experiences.
Of course they are just what we found worked for us, subject to
modification.
Note: The following assumes the bolt holes in your plaque are 1/4"
diameter and you use 1/2" OD (outer diameter) lead anchors.
I weighed all the components to get some idea, but didn't go to great
lengths to apportion the weight among people, etc.
If someone in the plaque-mounting party hikes slower than the others,
as I did in 2003, transfer some weight off them to other people.
I estimated 15 pounds for essential supplies including the plaque (about
7 pounds), but excluding the hammer drill and battery packs, and 17
pounds of optional supplies.
Supplies Needed
Essential:
-
memorial plaque (including packaging)
-
slip-joint pliers (various uses)
-
pocket knife and/or small scissors (for cutting plastic, etc)
-
rock chisel (to prepare smooth surface)
-
rock hammer or mallet
-
felt marker (to mark rock)
-
star drill
or
-
hammer drill plus
-
fully charged battery packs (we used four packs worth of charge on two trips)
-
4 each: 1/4", 5/16", 1/2" bits (we went through 4 bits since the rock
was especially tough, with quartzite in the conglomerate)
-
small round file (to enlarge plaque holes, tedious)
or
-
5/16" + 1/4" drill bits (to enlarge plaque holes)
-
plastic tubing (to blow rock dust out of bolt holes)
-
5 stainless steel bolts, 1/4", in each of 2 lengths (I like "Allen-head
cap bolts", and I think we used 1.5" plus 2")
-
5 lead anchors (nothing else is as good; check a hardware store to learn
about them)
-
anchor setting tool (could not find in stock so I made one; check
a hardware store to learn about them)
-
2 Allen (hex) wrenches of correct size for cap bolts
-
5 washers: stainless, 1/4" ID, < 1/2" OD (to cover enlarged plaque
holes if needed, used 5 #10 washers reamed to 1/4" ID)
-
5 washers: 1/4" ID brass (to cover enlarged plaque holes, did not use,
not optimal, larger diameter than #10, and would rust)
-
5 washers: 1/4" ID, 1/2" OD, steel (to raise anchors in holes if too deep)
-
wire brush (to remove lichen)
-
soft scrub brush (to clean rock surface)
-
light oil like 3-In-1 (to lube bolts for easier cranking)
-
soft clay like PlayDough (to protect anchor holes from cement)
-
several oz acrylic concrete bonding compound (to apply to rock before
cementing)
-
clear pre-measured cup (for cement water, mixed 5.5:1 per directions, in
our case 2 oz water to 11 oz cement, and we added a bit more since it
was too dry)
-
Quick Setting Cement (used 3 x 11 oz, that is, 3/4 of a small bucket
from Home Depot, pre-bagged, carried in butter tubs)
-
16 oz water (dedicated to cleaning and to mixing cement)
-
6 popsicle sticks (to mix cement)
-
small trowel (to spread cement)
-
lots of rags (for cleanup)
-
silicone cement (to fill bolt head holes)
-
plastic sheet (to cover plaque to keep cement wet longer)
Optional if enough help to carry:
-
rock hammer or mallet
-
cordless drill + two charged battery packs (to enlarge plaque holes)
-
masonry bits, 5/16" + 1/2" (just in case)
-
mechanical hand drill (backup, barely worth it)
-
extra concrete bonding compound (second small bottle)
-
extra Quick Setting Cement (we had extra 11 oz bag in tub)
Steps Involved
-
Design and order the plaque.
Request a flat back, no stubs, and predrilled mounting holes.
Ensure the bolt holes have enough flat space around them (free of raised
text or pictures) for washers if needed; say, 1/2" diameter for 1/4"
bolt holes.
-
Select a good site for the plaque.
Take into consideration the following:
-
Location, relative to summit, etc.
-
Size, shape, slope, and solidness of the rock to which to mount the
plaque, including water runoff or pooling.
-
Flatness of rock surface below the plaque (minimize chiseling).
-
Background and typical daily lighting for viewing and photography.
-
Mark the plaque's outline on the rock with a marker.
(If the plaque is not yet available, make and use an accurate template.)
Chisel the rock to an acceptable level of flatness, testing with the
plaque.
Ideally the plaque would sit flush to the rock, but not recessed, on all
edges.
Minimize the gap between the plaque and the rock on all edges, to keep
the cement as thin as possible.
(If you don't use cement at all, a very good fit is essential for looks
and to prevent crowbar-ing.)
Throughout all of this, be careful not to drop, ding, scratch, or
otherwise damage or mar the plaque.
-
Mark bolt hole locations as accurately as possible and drill
holes.
This was for us the most tedious and time-consuming step, especially on
Challenger with the manual star bit, but even on Columbia with the
impact drill.
The holes need not be perfectly parallel to each other, nor perfectly
perpendicular to the rock face and the plaque, but must be
center-aligned as carefully as possible with the bolt holes in the
plaque.
Ours were 1/4", so we started drilling with that size -- for Columbia
only; for Challenger we simply hand-drilled 1/2" anchor holes and got
lucky.
The goal is an outer hole deep enough to accept the lead anchors when
set, and not too deep (so the bolt can reach the whole anchor).
Our outer diameter was 1/2".
Each outer hole is centered on a deeper inner hole that is initially the
exact bolt size, in our case 1/4", then enlarged for slack, in our case
to 5/16", leaving a shoulder between the outer and inner holes on which
the anchor rests.
The inner hole allows the bolt to extend below the bottom of the anchor,
making vertical tolerances less critical.
During drilling a second person blows rock dust out of each hole with
the plastic tubing.
You are done drilling when each outer hole is at least as deep as the
length of the lead on your anchors, and the inner holes are deep enough
to accept your longer-length bolts (allowing for the height of the
plaque itself).
Note, the lead squishes down some when you set the anchor, so you need
not go very deep.
It's difficult to test the holes because the anchors do not (and should
not) easily drop in and then pull back out.
We tested our holes by putting the longer bolts through the plaque holes
and setting the plaque down to see that they would all fit (inner holes
deep enough).
Then we used the bolts free-hand as depth measuring tools to guesstimate
that the outer holes were deep enough for the anchors.
I think at the end the holes had been reamed out in diameter enough that
we could gently shove the anchors into them until at least flush, and
still remove them, as a final test.
-
Scrub the rock clean of lichen, etc. with the wire and soft
brushes.
Use a little of the water to rinse it off.
Blow the water and mud out of the bolt holes.
-
Set the lead anchors.
Take a deep breath and hammer them straight and solid into each hole
with the anchor setting tool.
Stop when they feel solid; be careful not to wreck the soft inner
threads on the metal inserts.
After the anchors are set, take pains not to get any crud down into the
bolt holes, as it would be hard to remove.
-
Test that the plaque aligns with the anchors.
Try to screw it down using the shorter bolts; lube the bolt ends first
with light oil.
If the alignment is not perfect, as it was not on Columbia despite our
best efforts, drill or file out one or more of the plaque's holes as
necessary.
Do this carefully so as not to mar the plaque.
On Challenger since we hand-drilled the holes in the rock, they were
"loose" enough that alignment was not an issue.
And since I didn't bring an anchor setting tool, we had to fake it with
a screwdriver...
Again, we got lucky.
On Columbia we ended up having to drill (ream) all four holes in the
plaque to 5/16".
Note: As soon as you ream one hole larger, you commit to using the
washers on the cap bolts (assuming you also like these attractive,
narrow-headed bolts).
I preferred stainless steel washers, and to keep them narrow in outer
diameter I bought #10, not 1/2", and reamed out their centers at home to
1/4" with a diamond burr -- not easy, but the results looked nice.
If you ream one or two holes and the plaque still won't bolt down
cleanly, don't panic, don't enlarge those holes further.
Remember that you can instead ream the remaining holes to get more
slack, as we did on Columbia.
At this point you'll know if the shorter bolts will reach the anchors
well, or if you must use the longer bolts on one or more of the holes
(because it was drilled too deep).
-
Regretfully, unbolt the plaque again and set it aside, you are
not done yet, assuming you want a nice cement backing and border.
Next, using a rag, paint the rock surface under the plaque and an inch
or two beyond it with the concrete bonding agent and let it dry
(if you have time), per directions on the container.
-
Make and apply a small "donut" of clay around each bolt hole to
keep cement out of the hole.
Place a thin round sheet (flat circle) of clay over each donut, across
the top of the hole.
The bolts will pierce this later.
-
Mix the cement.
We used quick-setting cement so it would be hard before we had to leave,
but this only gave us a few minutes of working time (nominally about 5,
but actually about 8 per my wristwatch).
Coordinate with the crew so the cement is ready on cue.
We used the marked measuring cup and the popsicle sticks to mix up two
of the 11 oz bags, each in its plastic butter tub.
Then we troweled the wet cement into place on the rock around the clay
doughnuts.
-
Moment of truth: As soon as possible, carefully position
and set the plaque down on the cement, but do not push down on it yet.
Put one bolt (plus washer if using them) through a plaque hole, pierce
the clay, and carefully screw it a little ways into an anchor.
Next do a second bolt, then the remaining two (which hopefully go
smoothly).
Now as fast as possible, before the cement hardens, screw all four bolts
down evenly to squash down and out the cement and clay, until they are
reasonably but not totally tight.
Hopefully your anchors were set well and none of them moves!
-
Trowel off the excess cement around the edges of the plaque
before it hardens.
(Take some of it home as a "proof test" later that the cement did harden
well.)
Also remove as much of the clay as possible, using popsicle sticks too
for digging it out from under the edges of the plaque.
-
Mix up another batch of cement.
We found one more 11 oz bag was sufficient.
Apply it around the edges of the plaque as a bevelled border, up to but
no higher than the edge of the plaque.
Shove it under the plaque where clay was dug out, and smooth it gently
to a finished surface.
Wet fingers seem to work best for this.
-
Breathe a sigh of relief and do some cleanup -- hands, tools,
rock around the cement.
With a wet finger or rag, smooth the cement along the top edges of the
plaque.
When the cement is hard enough, finish cranking down the bolts to
whatever seems right.
Then, if you choose, fill their hex head holes with silicone cement,
mostly for looks and to keep out debris.
On Challenger we had more time and after the cement was plenty hard, I
coated it with a film of silicone cement too, to keep it wet and
protected longer...
Probably not essential.
-
Carefully clean the inevitable cement traces and rock dust off
the plaque's face with rags.
Now it's ready for "beauty shots" (photographs).
-
Before leaving, cover the plaque and cement with a sheet of
plastic cut to extend to the rock around it.
Secure this sheet with plenty of small stones so it won't blow away.
(If your mounting surface is too steep and the stones roll off, find a
different method.)
The goal is to keep the cement as wet as possible (and not let it freeze
either) for 24 hours for best hardness.
If appropriate, leave a written note on top of the plastic asking later
visitors to not remove the plastic for a day, and then to take it down
as trash.
That's it!
Return and enjoy your handiwork over the years ahead.