Rock Collecting Pouch Directions
Alan Silverstein,
ajs@frii.com
Last update: December 14, 2019
Purpose:
This webpage illustrates and gives directions on how to make a
field-tested, "Mark III", sew-it-yourself rock collecting pouch for
carrying small stones.
I documented and shared my design just for fun.
("Mark III" pouch first sewed in March, 2003. Website created in April,
2008 when I made up a new one, which was heavily used and wearing out by
December, 2019, whereupon we sewed up another replacement.)
I do a lot of hunting for small rocks to
tumble-polish.
Once upon a time I started using a carpenter's pouch with a tie-on
cloth-string waistband.
The capacity wasn't great, the string was painful when the pouch was
full, and it wore out and broke fast.
I improved on the pouch through several models until arriving at the
design explained here.
Features:
-
Good capacity:
When I fold a full pouch over in the middle and dump it into a bucket, I
find it holds up to about a gallon of rocks.
This is about the limit of comfort anyway for weight and volume hanging
from my waist.
The pouch can handle individual rocks up to about baseball-size.
(On longer outings bigger treasures go into my knapsack, where I also
carry plastic bags, water, munchies, sunscreen, etc.)
-
Rugged:
My
old pouch
(third model) has held up well after many outings.
It doesn't mind being filled up, wet, muddy, brought home full, etc.
Also the buckle doesn't pop open even when the pack is full and I'm
contorting my way up a steep, rocky hill.
-
Easy to use:
The pouch is convenient to access, but you can almost ignore that it's
on your waist.
It doesn't interfere with wearing a light pack or knapsack at the same
time.
Also, I discovered it's important that the front side fabric be wider at
the top of the pouch than the back side fabric, so the pockets "bulge
open" and are easy to fill.
Overlooking this results in a tidy-looking pouch that's almost
impossible to use when it's strapped around your waist.
-
Hands-free use:
You can add rocks to the pouch "by feel" while continuing to scan for
more finds.
-
Multi-purpose:
I've also found the pouch handy for carrying a one-liter water bottle,
rock tools like a chisel, etc.
-
Optional rock hammer loop(s):
You can sew on some extra webbing to make a place to hang one or more
tools, like a rock hammer, on your hip.
-
Not expensive:
Materials to build a pouch cost me about $7 in 2004.
The fabric is the cheap part...
Most of the expense is for webbing and buckle parts.
-
Fun to make:
Construction takes about an hour, more or less, depending on your sewing
machine and your skills.
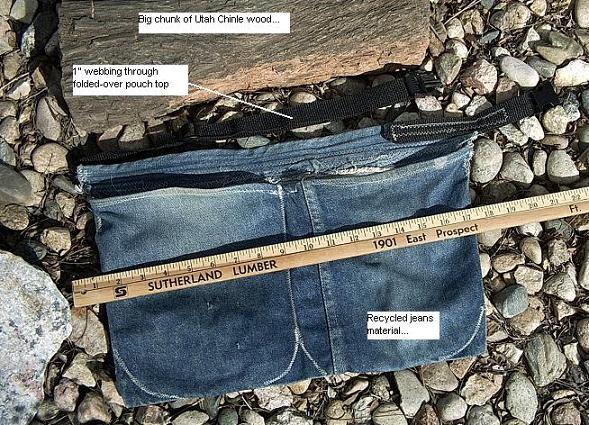
Pictures:

|
My old, well-used, third-generation rock pouch made from recycled
jeans material.
|

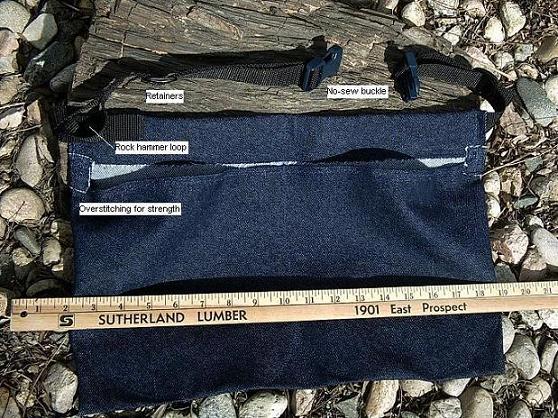
|
A brand new pouch, not yet used, made of fresh rather than recycled
fabric, following the same design.
|
|
Pattern (PDF)
|
A sketch of the pattern for the fabric for the pouch.
|
Parts list:
| Item needed |
Approx cost |
Notes |
Fabric, indigo denim, stretch, 19x22"
(97% cotton, 2% lycra) |
$1.00 |
Vary to taste.
Some people recommend canvas, but I don't think this would be as
easy to sew, nor last as long. |
| Webbing, 1x60' |
$1.84 |
Color of your choice. |
| Buckle, plastic, no-sew, 1" |
$2.32 |
Color of your choice.
A "no-sew" model is easier to replace later if it gets broken, say
by being caught in a car door.
(Guess how I discovered this, as you can see in the picture of my
old pouch where I had to replace the
buckle on the short side.)
|
| Loose end clips, 2-pack, 1" |
$1.29 |
Only needed with no-sew buckles.
These hold the loose ends of the webbing straps out of the way and
keep the buckle adjustments from working loose. |
Directions:
-
Cut the fabric to the size and shape shown in the pattern,
overall 19" wide at the top tapering to 17" wide at 9" down, continuing
17" wide for another 13" (a 17x13" rectangle).
You can vary these dimensions to taste.
I've found these numbers to work pretty well in terms of pouch size and
capacity, neither too big nor too small, and with enough slack on the
pocket fronts.
-
Decorate: If you want to sew a cloth patch or other decorations
to the front of the pouch, now's the time to do it.
I didn't happen to think of this for the pouches illustrated above.
-
Fold and hem the top edge down 1/2" or less, good side out.
This hem becomes the top outer edge of the pockets.
Use one or two folds as you prefer, but beware two folds unless you and
your sewing machine can handle a lot of fabric thickness at the corners
later.
With a single fold the raw edge inside the pouch frays a little, but
this doesn't bother me.
-
Sew basic shape:
Fold vertically 8.5" down from the top (9" less the hem), inside out.
The horizontal fold (at the top of the rectangular lower portion of the
fabric) becomes the bottom of the pouch.
Overlap the sides such that the edges align, although this means extra
fabric on what will become the front of the pouch pockets.
Ensure the sides are symmetric; measure if necessary.
Sew a sturdy hem 1/2" wide or less in the overlapped material.
Overstitch at the tops for strength.
-
Finish sides:
Invert the pouch right side out and hem the remaining 4" of
non-overlapped sides, now at the top of the pouch, for strength.
Note: I failed to do this right in the
new pouch pictured above.
Instead I had to over-sew some extra material for strength.
These upper outer corners take a lot of the weight and are the
first places to wear out and rip, so make them strong.
-
Sew centerline:
Fold the pouch over horizontally to find and crease the middle.
If necessary measure to find the middle of the slack material on the
front of the pouch so the pockets are symmetric.
Unfold and sew down the centerline where the front and back overlap,
dividing the pouch into two halves.
Overstitch at the top for strength.
Yes, you can skip dividing the pouch into two halves, but I find this
convenient in some ways, such as dividing rocks into two types as they
are collected.
Also it's more comfortable than a single large pocket would be.
-
Sew inside corners:
While the pouch is still on the machine from the previous step, sew a
U-shape on each side near the centerline to close off the inside corners
of each pocket.
How big a U is up to you.
This optional step prevents small stones from getting stuck in the
corners.
On the
new pouch pictured above
it's hard to see this stitching because my new wife convinced me it's
gauche to use wrong-color thread like I did on the
old pouch.
-
Sew outside corners:
Now do the same thing to the outside corners to finish each U.
-
Sleeve over webbing:
Lay the webbing horizonally across the top of the pouch above the
pocket.
Fold the top "flap" over the webbing and sew it into a sleeve without
yet attaching it to the webbing, so it can still slide left and right.
Whether to fold the flap forward or backward is up to you, either way is
OK depending on the finished look you want.
Bringing it forward means the nicer outside of the denim is mostly what
you see, but the raw edge of the material also shows (shrug).
-
Attach to webbing:
Slide the webbing through the sleeve until it's placed where you want
it, probably not in the center.
Think about it for a moment before sewing.
I like the buckle to end up on my left side, somewhat behind, but not in
the very middle of my back, so it's easier to reach.
Also 60" is more webbing than you should need, depending on your waist
size.
Figure out how much you need on the "short side" to go through one half
of the buckle, put it in the right place, and leave a bit of loose end.
Once you have it where you want it, sew the heck out of the sleeve to
firmly attach it to the webbing.
Especially overstitch at the corners near where the webbing leaves the
sleeve.
I also like to run a vertical line in the center.
-
Finish belt:
Cut unneeded material off the long end of the webbing.
With a 36" waist I found I could cut off about 8" and still have a good
length of loose end.
To determine this I put the webbing ends through the buckles, put on the
pouch, and fiddled with adjustments until it felt right.
After cutting off the extra webbing, seal the ends over a match,
lighter, or candle to melt the threads a bit so they won't fray.
Remove the buckles, add the loose-end retainers, put the buckles back
on, and set everything how you like it.
-
Add hammer loop:
If you want a hammer loop, sew some of the short piece of webbing to the
long side of the "belt", on the outside of course, near the pouch.
Be sure to make the loop bigger than you might think.
Start by attaching one end near the pouch, then while you're wearing
the pouch, hold or pin the other end of the loop where you think you
want it, and try inserting and removing the hammer.
You'll figure out how much loop material to use and how far out from the
other end to attach it for best results.
Then sew down the other end of the loop.
-
Go have fun:
That's it!
To put on the pouch, bring the belt around your waist so the buckle
halves are in front.
Connect them, then slide the pouch around (in my case, to the left) so
the pockets are in front and the buckle ends up out of the way but still
in reach (on my left rear).
Being on the longer side, the hammer loop ends up on my right hip.
If you need to adjust the straps to make the pouch looser or tighter,
you might be able to do it while wearing it, if it's empty, but usually
it's easier to take it off first.